| Home | About Us | Overview | How to Start | White Papers | Contact Us |
Inmate Task Communication eTaskBoard was designed for all participants to be online. For at least the next few years, we expect prison inmates to have security restrictions against any online access. When this is relaxed to allow internet access restricted to designated IP addresses, eTaskBoard will work in its native form, and this document will become obsolete. Until then, eTaskBoard for inmates will operate as noted in the implementation section of the Prison Inmates as Teleworkers white paper. What is referred to there as the sneakernet involves carrying a USB memory stick (aka pendrive) with task data, including its attachments, from the Coordinator's PC to the inmate's PC as work assignments, and then back again as work products. In cases where the prison institution prefers to use a restricted LAN drive to allow inmate and Coordinator access, the sneakernet architecture will be identical except for walking the memory stick.
Below follow the details for installing the application for the inmate's PC and its operation. As is all of eTaskBoard, the custom task management application on the inmate's PC is written in the PHP language. For an inmate's Windows-based PC, we use xampp as the development and operating environment, also called a personal webserver. 1) To begin, click the xampp download link. Since it is an executable, your PC will put it in your default downloads folder. Right click on it there and select the option to run it in administrative mode, and it will begin installing. Select a destination folder like C:\xampp
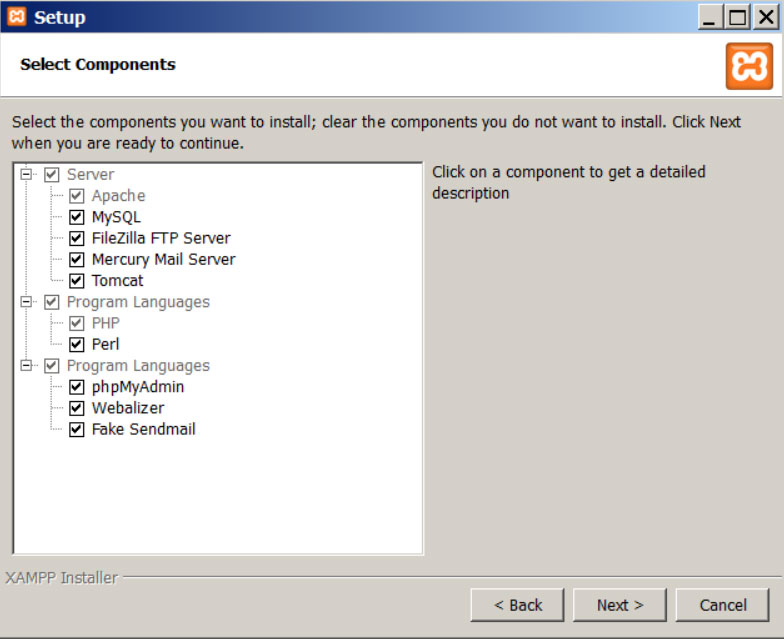
3) When asked to extract the components
as per the image below, leave everything checked even though we don't use
everything for now.
7) Similarly, click the link to download and then extract the contents of the file shared.zip to the location C:\xampp\htdocs\sites\shared\classes where you'll need to add the shared\classes folders. 8) Then click the
link to download the httpd-vhosts.conf file. No
need to unzip it, just copy it to replace the same file in
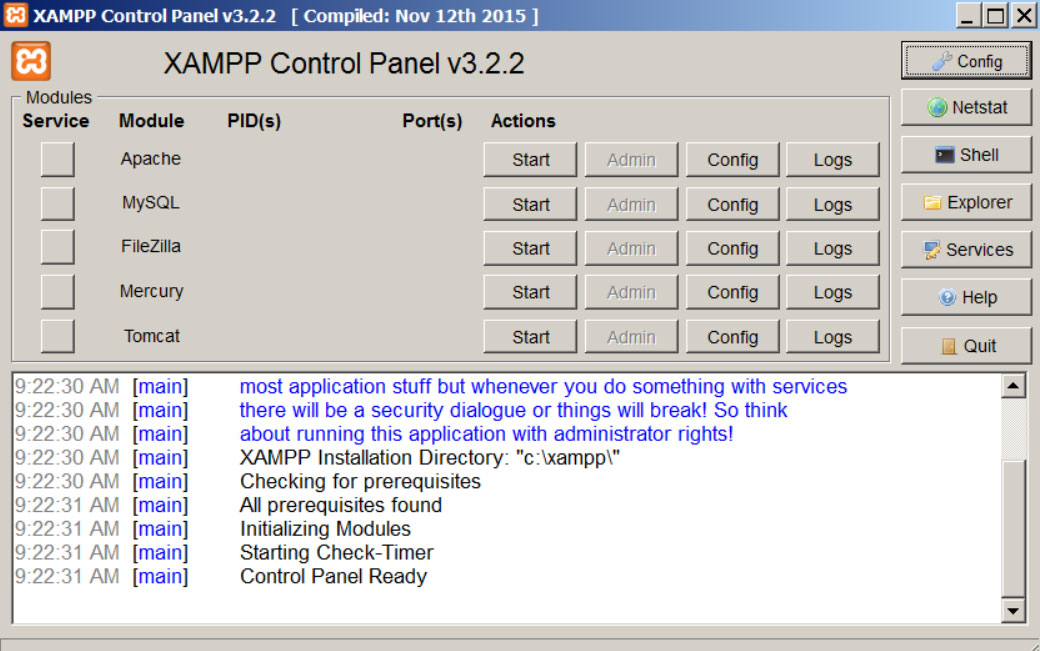
the 9) If your above XAMPP Control Panel is
no longer open, go to C:\xampp and double click an executable xampp-control.exe
file. That will redisplay the control panel where you click an icon called
Shell near the right. A terminal window will open. Type into it the command
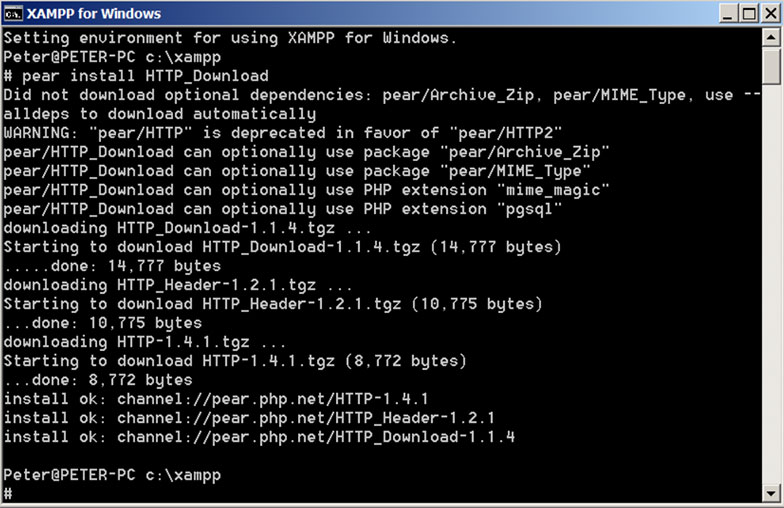
below and press enter: 10) After pressing enter, the terminal
window should look as below. 11) Next, you'll need to find a C:\Windows\System32\drivers\etc\hosts file with no extension, and add a line to it. Best is to use a program like Notepad++ but you can make it work with regular Notepad. Below, they're both called notepad. 12) The problem is that hosts is a system file so Windows won't just let you edit it. First make sure every other Windows application has been closed. Windows won't allow editing it while anything is using it. Then right click the notepad program icon and from the drop-down list select the one that allows you to open it as administrator. Then you can click and drag the hosts file into notepad for editing. 13) At the bottom of the hosts file,
enter a new line as below: 14) One of the difficulties with Notepad is that it doesn't show the separate lines of the hosts file as does Notepad++. You'll have to find those lines based on content. Also watch out that notepad doesn't sneak (without telling you) a .txt extension onto the hosts file when you save it. It must be saved without an extension over the existing hosts file. 15) If Windows continues to refuse to save your hosts file, you may need to reboot Windows in protected mode (F8 repeatedly clicked on boot) and try the above. After you're saved and done, reopen the hosts file to confirm the added line is there. 16) To start the web server after the
above, double-click 17) To restart the webserver, first
click: 18) You can test the webserver by entering http://localhost into your browser to see that xampp is there. 19) Finally,
enter With the above installation complete, regular operations require only that your Drive I: be functional (see below), xampp be loaded (step 16 above), the inmate's eTaskBoard be launched (step 19 above), and the task transfers below to be managed. Note that you will occasionally be asked to repeat step 6 to update the custom software. Whether using a USB memory stick or a restricted LAN drive, make that your I: Drive if at all possible. That is where tasks will come and go.
To test task transferring on a PC without such an I: Drive
and with the transfer location a C: Drive folder, map the I: Drive to the C:
Drive. There are several ways to do this but the Windows subst command is a
good way to go, for example: In the TaskMeister module of eTaskBoard, a Coordinator has a command icon near the top-right of each task display to export and zip a task. He will click that when he wants to propose the task to an inmate, assuming all other task info is complete such as the task descriptions, hours authorized, comment notes, etc. Clicking that icon produces a X.zip file in the default download folder of the Coordinator's PC with X equal to the task ID field's value. The Coordinator will need to copy the X.zip file to an I:\etb\Y folder, subject to the above subst mapping if necessary, where Y is the username of the inmate to whom the tasks have been assigned. Using batch commands or keyboard macros linked to control keys is a way to automate this. As soon as an inmate logs in, he will see a list of the tasks that were in his I:\etb subfolder, with regular TaskMeister commands available to edit the task. As soon as the inmate changes the task Status field's picklist to "Developed" (or "Done" which they normally cannot do), the task information, with its attachments that are typically the work products, are moved to I:\etb\completed (all tasks from all inmates) as encrypted zip files, and removed from the inmate's task list. The Coordinator will periodically click a command icon to display a popup through which he can upload the zip file contents of the I:\etb\completed folder, and then delete the uploaded files from I:\etb\completed to make way for new completed tasks. Such uploaded files will be unzipped, decrypted, and added to the Coordinator's task management list within the regular online eTaskBoard, typically to review task deliverables and convey them to the employers. |
Copyright © 2016 Bizware Online Applications, Inc. All rights reserved.
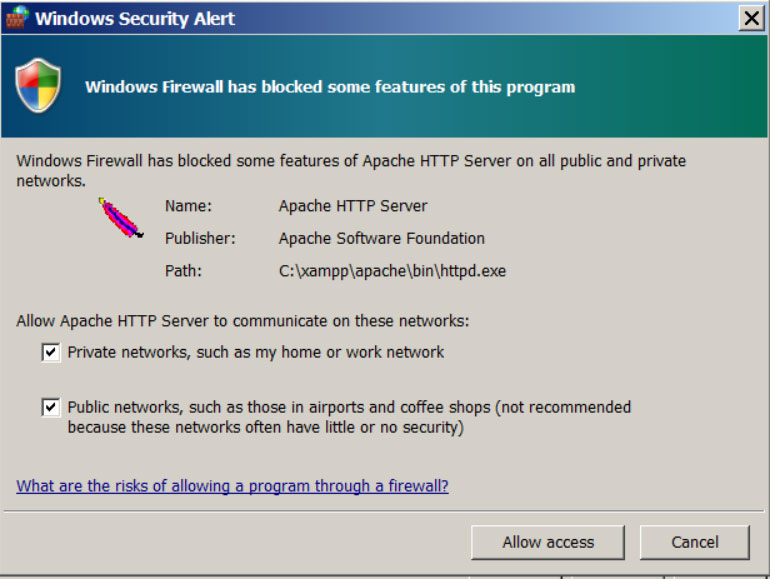
 2) Disable your antivirus if you get
warnings like the one at right, or disregard it as the install will probably
still work.